|
In this lesson you'll learn about:
- What is TextPipe?
- Opening TextPipe
- The main elements of TextPipe's screen
- How to use the Trial Run area
- How to open (load) and save filters.
What is TextPipe?
TextPipe is a powerful text transformation workbench that performs an
enormous range of conversions and manipulations to text files. It is unique in
the number of transformations that can be performed at one time, in the power
and flexibility of its transformations, in the size of files it can handle and
more. Data can be extracted from databases in a variety of text formats, and
custom transformations can be written in VBScript, JScript and other scripting
languages.
Opening TextPipe
If you haven't already started TextPipe, start it now by
- Double-clicking on the TextPipe icon
 on the desktop OR on the desktop OR
- Clicking on TextPipe in the Start Menu\Programs\TextPipe folder
TextPipe starts with a new filter list (you may have to click Ok to clear the About
dialog in the evaluation version, and close the Tip Of The Day and Filter Wizard
dialogs).
The TextPipe Screen
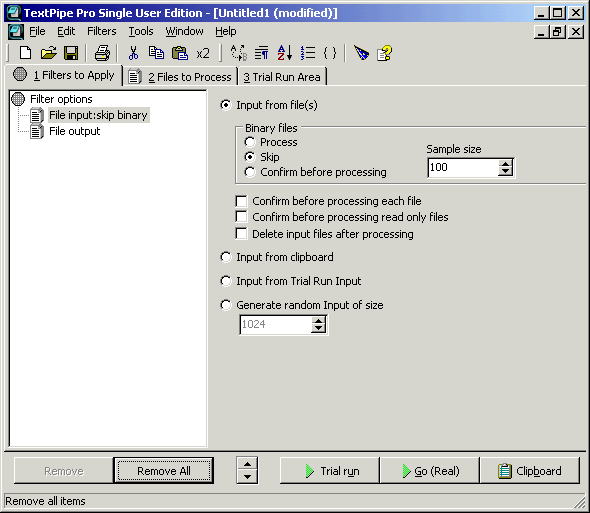
At the very top of the TextPipe window is the Title Bar. The Title Bar tells
you which filter list you are working on and whether it has been modified or
not. Below the Title Bar is the Menu Bar, with the customary File, Edit, Window
and Help menus, along with a Filter menu that categorize text processing filters
into functional groups (we'll come back to filters in a minute).
Below the Menu Bar is the Tool Bar. The Tool Bar has icons for the most
commonly used features of TextPipe, such as saving and loading filter list
files, cutting and pasting and so on. The Tool Bar saves you having to navigate
through the menus. If you hover the mouse cursor over a Tool Bar icon for a
second, a hint will be displayed beside the mouse cursor that describes what the
icon is for. At the same time, a helpful message will be displayed in the Status
Bar at the base of TextPipe's window. You should watch for helpful text in the
Status Bar whenever the mouse cursor is over a field in TextPipe's window,
because the Status Bar always has extra information for you.
The Tab Bar is below the Tool Bar, and it contains a group of tabs that
divide up the main tasks within TextPipe. We'll cover it in more detail below.

What is a filter list?
A TextPipe filter list consists of:
- A list of operations to perform (filters)
- A list of files that will be processed
- (Optionally) Trial text that can be used to test the filter list.
To understand this more fully, we'll open a sample filter.
Opening (loading) a filter list
- On the File Menu, click Open
- The Open Filter List window appears
- Double click on the Tutorial folder (if you can't find it, it's usually in
C:\Program Files\TextPipe\Tutorial). Note - you can load
any filter from the subject area subfolders such as coding, conversions,
email, etext, fun, html, sysadmin or vbscript
- Double click on 'lesson1'
- TextPipe opens the lesson1 filter list.
The default tab is the Filters to Apply tab. It
shows which
filters will be performed, and in what order. Order is very important! In our lesson1
filter list, the only filter we will use is a straight-forward search and replace filter, which
replaces capital T with lowercase T. We will cover the File
Input and File Output filters
later.
Click on the Files to Process tab. Although currently empty, this is
where we list all the files that should be processed.
Click on the Trial Run tab.
The Trial Run Input area already has some sample text. When we test the filter with a Trial Run, the
Trial Run output appears on the
right hand side so that we can compare the output with the original, and make sure that
the filter works as we expect. This can be really handy for complex filters.
Click the Trial Run button at the base of
TextPipe's window. Some new text
appears on the right hand side - with all capital T's replaced with lowercase
t's (3 in all). This is exactly what we expect -
because we have a single filter that is called Replace [T] with [t].
Add the text 'This is my line of text.' to the end of the text in the Trial
Input area, and click the Trial Run button again. The new output text is shown.
Click the Trial Run button again. TextPipe toggles between the Filters
to Apply tab and the Trial Run tab
each time you click this button, although if you've
changed the Trial Input text (as we just did), it will re-process the text and display the
output in the Trial Run Output area without toggling.
Saving a filter list
If you want to save the filter list:
- On the File Menu, click Save.
If you want to save the filter list with a new name:
- On the File Menu, click Save As
- The Save Filter List window appears
- Type in a new name
- Click the Save button.
In the next lesson we'll look at
- How to add filters to the filter list
- The importance of filter order.
Exercise 1
- Open one of the filters in TextPipe's 'fun' folder - try Elmer Fudd.fll (usually C:\Program
Files\TextPipe\Fun)
- Type some text of your own into the Trial Run Input
area
- Click the Trial Run button to see what they do.
Tutorial Index
| 